ModCraft Developer Guide
Acknowledgements
This project is based on the AddressBook-Level3 project created by the SE-EDU initiative.
Libraries used in this project:
Setting up, getting started
Refer to the guide Setting up and getting started.
Design
Architecture
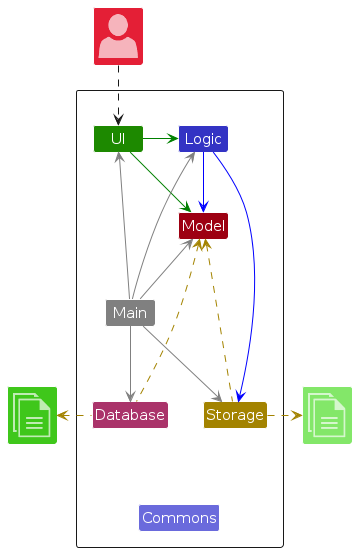
The Architecture Diagram given above explains the high-level design of the App.
Given below is a quick overview of main components and how they interact with each other.
Main components of the architecture
Main (consisting of classes Main and MainApp) is in charge of the app launch and shut down.
- At app launch, it initializes the other components in the correct sequence, and connects them up with each other.
- At shut down, it shuts down the other components and invokes cleanup methods where necessary.
The bulk of the app's work is done by the following four components:
UI: The UI of the App.Logic: The command executor.Model: Holds the data of the App in memory.Storage: Reads data from, and writes data to, the hard disk.
Database parses data from within the App on startup. This data is used to support user input validation according to the business logic.
Commons represents a collection of classes used by multiple other components.
How the architecture components interact with each other
The Sequence Diagram below shows how the components interact with each other for the scenario where the user issues the command delete CS2030S.
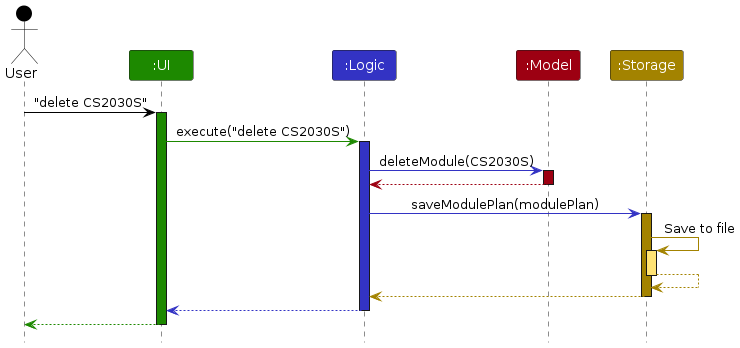
Each of the four main components (also shown in the diagram above), as well as the Database component,
- defines its API in an
interfacewith the same name as the Component. - implements its functionality using a concrete
{Component Name}Managerclass (which follows the corresponding APIinterfacementioned in the previous point.
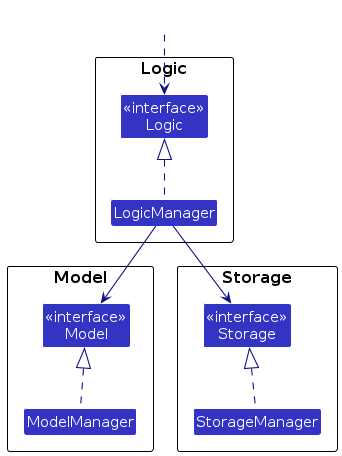
For example, the Logic component defines its API in the Logic.java interface and implements its functionality using the LogicManager.java class which follows the Logic interface. Other components interact with a given component through its interface rather than the concrete class (reason: to prevent outside component's being coupled to the implementation of a component), as illustrated in the (partial) class diagram below.
The sections below give more details of each component.
UI component
The API of this component is specified in Ui.java
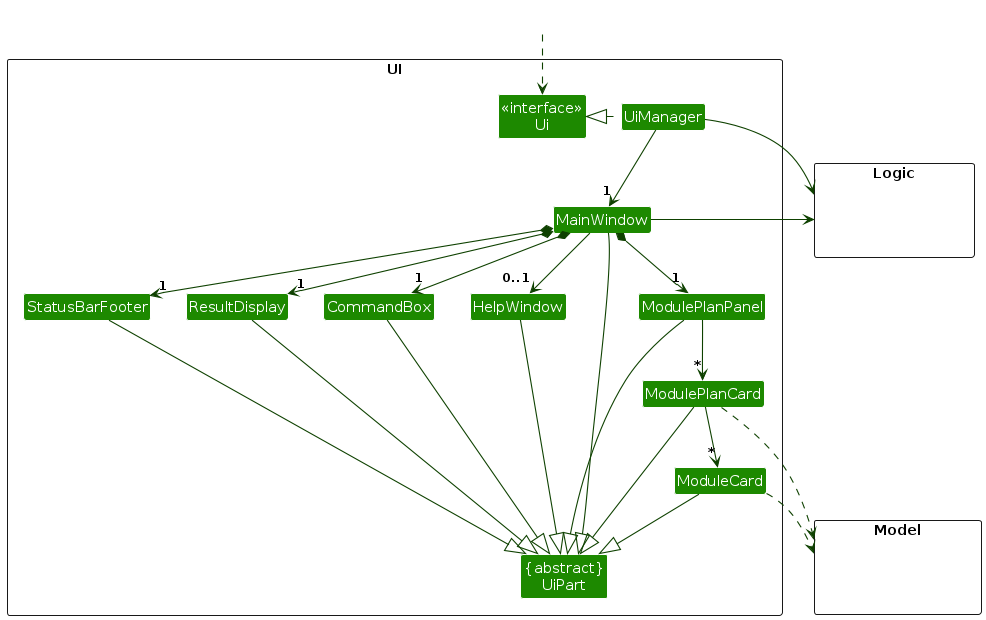
The UI consists of a MainWindow that is made up of parts e.g.CommandBox, ResultDisplay, ModulePlanPanel, StatusBarFooter etc. All these, including the MainWindow, inherit from the abstract UiPart class which captures the commonalities between classes that represent parts of the visible GUI.
The UI component uses the JavaFx UI framework. The layout of these UI parts are defined in matching .fxml files that are in the src/main/resources/view folder. For example, the layout of the MainWindow is specified in MainWindow.fxml
The UI component,
- executes user commands using the
Logiccomponent. - listens for changes to
Modeldata so that the UI can be updated with the modified data. - keeps a reference to the
Logiccomponent, because theUIrelies on theLogicto execute commands. - depends on some classes in the
Modelcomponent, as it displaysModulePlanSemesterobject residing in theModel.
Logic component
API : Logic.java
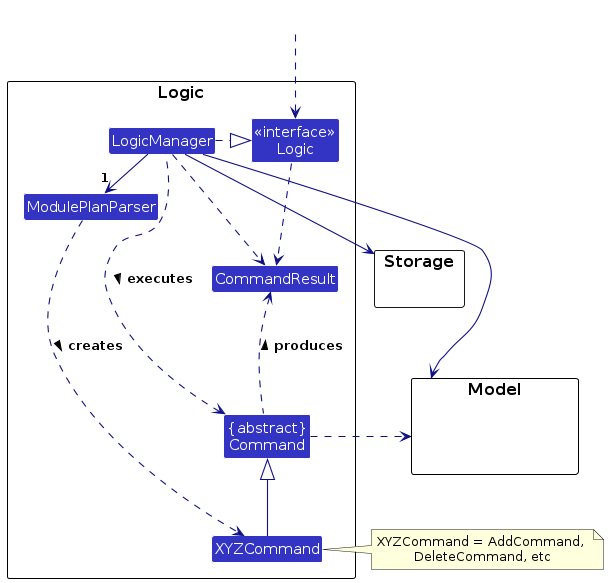
Here's a (partial) class diagram of the Logic component:
The sequence diagram below illustrates the interactions within the Logic component, taking execute("delete CS2030S") API call as an example.
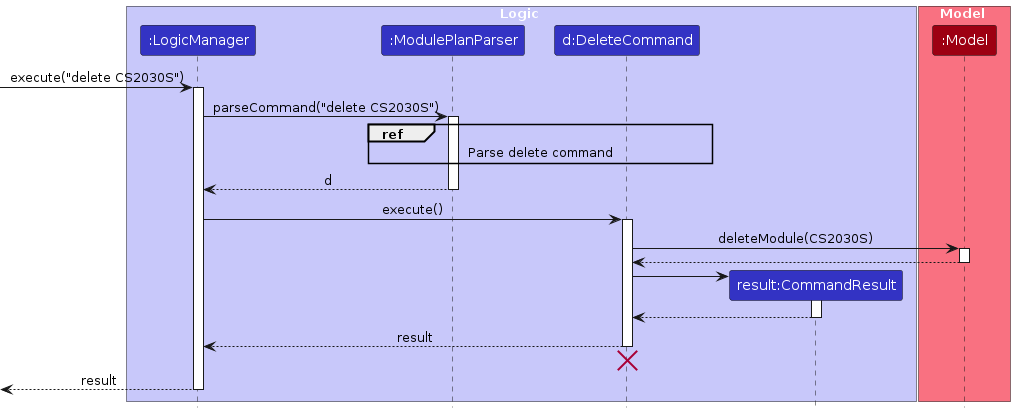
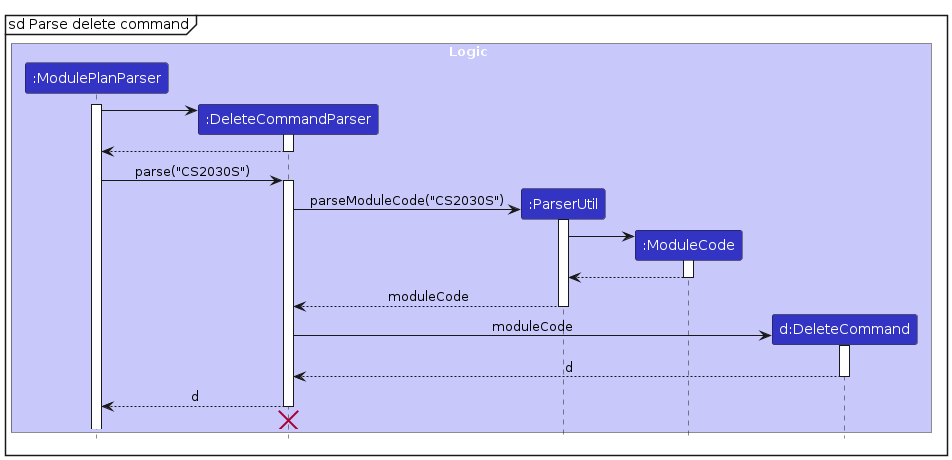
Note: The lifeline for DeleteCommandParser should end at the destroy marker (X) but due to a limitation of PlantUML, the lifeline reaches the end of diagram.
How the Logic component works:
- When
Logicis called upon to execute a command, it is passed to aModulePlanParserobject which in turn creates a parser that matches the command (e.g.,DeleteCommandParser) and uses it to parse the command. - This results in a
Commandobject (more precisely, an object of one of its subclasses e.g.,DeleteCommand) which is executed by theLogicManager. - The command can communicate with the
Modelwhen it is executed (e.g. to delete a person). - The result of the command execution is encapsulated as a
CommandResultobject which is returned back fromLogic.
Here are the other classes in Logic (omitted from the class diagram above) that are used for parsing a user command:
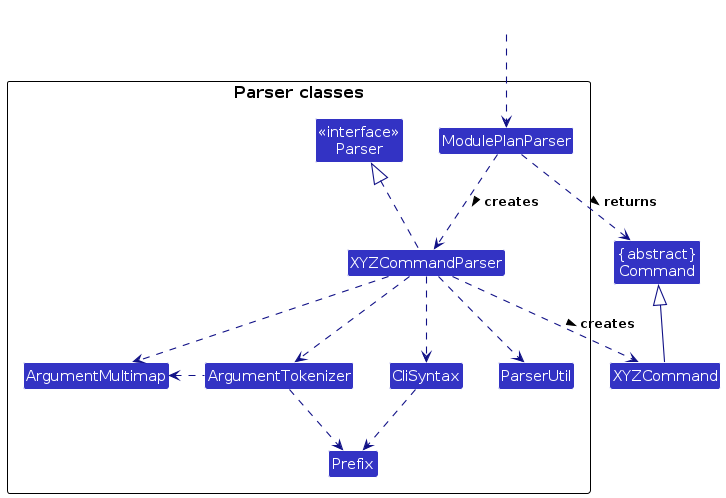
How the parsing works:
- When called upon to parse a user command, the
ModulePlanParserclass creates anXYZCommandParser(XYZis a placeholder for the specific command name e.g.,AddCommandParser) which uses the other classes shown above to parse the user command and create aXYZCommandobject (e.g.,AddCommand) which theModulePlanParserreturns back as aCommandobject. - All
XYZCommandParserclasses (e.g.,AddCommandParser,DeleteCommandParser, ...) inherit from theParserinterface so that they can be treated similarly where possible e.g, during testing.
Model component
API : Model.java
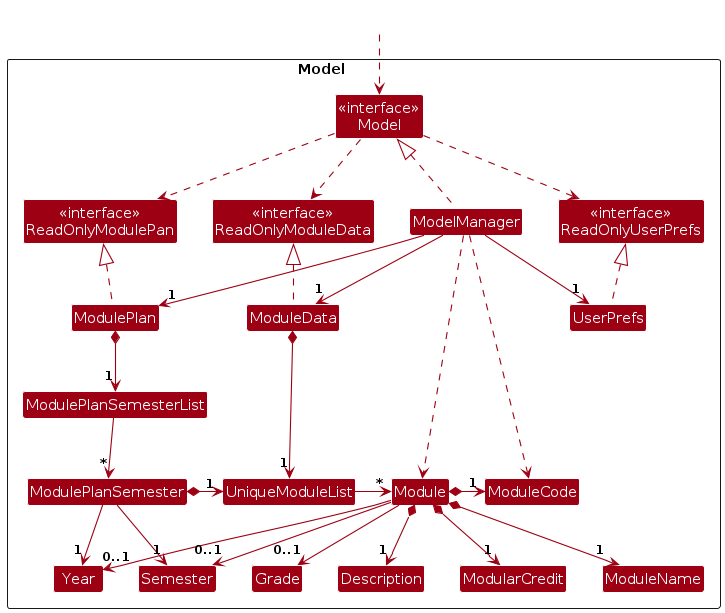
The Model component,
- stores the module plan data i.e., all
Moduleobjects (which are contained inUniqueModuleListobjects). - stores a
UserPrefobject that represents the user’s preferences. This is exposed to the outside as aReadOnlyUserPrefobject. - stores a
ModuleDataobject that represents the information on all modules. This is exposed to the outside as aReadOnlyModuleDataobject. - does not depend on any of the other four components (as the
Modelrepresents data entities of the domain, they should make sense on their own without depending on other components)
Note: The module plan data is split into different semesters (e.g. Year 1 S1, Year 1 S2, Year 2 S1, etc). Instead of one UniqueModuleList storing all of the user's modules across multiple semesters, each semester's modules are stored in their own UniqueModuleList object. Nevertheless, modules are required to be unique across semesters, meaning that the same module will be prevented from being added to multiple semesters. The implementation of this check can be found in ModulePlanSemesterList.
Storage component
API : Storage.java

The Storage component,
- can save both address book data and user preference data in JSON format, and read them back into corresponding objects.
- inherits from both
AddressBookStorageandUserPrefStorage, which means it can be treated as either one (if only the functionality of only one is needed). - depends on some classes in the
Modelcomponent (because theStoragecomponent's job is to save/retrieve modifiable objects that belong to theModel)
Database component
API : Database.java
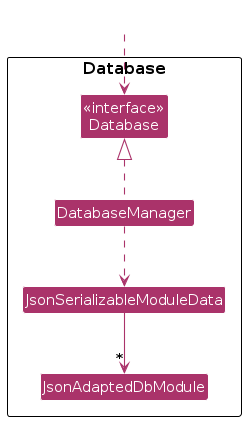
The Database component,
- reads the module information from JSON format to the corresponding
ModuleDataobject. - depends on some classes in the
Modelcomponent (because theDatabasecomponent's job is to retrieve read-only objects that belong to theModel)
Note: The module data is stored within the resource folder. In the case where the data cannot be read successfully, a RuntimeException is deliberately triggered to forcefully halt the application's execution. This is necessary because all features are reliant on the module data.
Common classes
Classes used by multiple components are in the seedu.address.commons package.
Implementation
This section describes some noteworthy details on how certain features and commands are implemented.
- Module Plan
- Module Storage
- Module Data
- Info Module Command
- Add Module Command
- Edit Module Command
- Delete Module Command
- Calculate CAP Command
- Calculate MC Command
- [Proposed] Pre-requisite checking
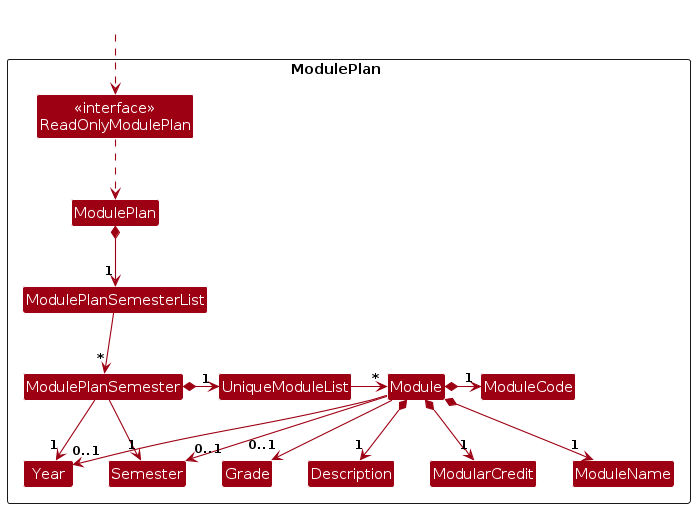
Module Plan
Overview
ModulePlan is a collection of classes that wraps all the information regarding the user's timetable and houses all the Module in the user's study plan. It has a facade class ModulePlan that handles all calls into the ModulePlan Component. The internal lists can only be modified through calls to the facade class as it is only exposed as a unmodifiableObservableList.
The ModulePlan implementation consists of 4 levels of classes in the following order:
ModulePlanModulePlanSemesterListModulePlanSemesterUniqueModuleList
The class diagram below shows the OOP structure of the ModulePlan component:
Implementation
ModulePlan:
ModulePlan is the facade class of the ModulePlan component. It contains exactly 1 ModulePlanSemesterList that is initialised whenever a new instance of ModulePlan is created. There isn't any logic implemented in this class, it just passes down information to the lower level classes and relays back the response to the caller.
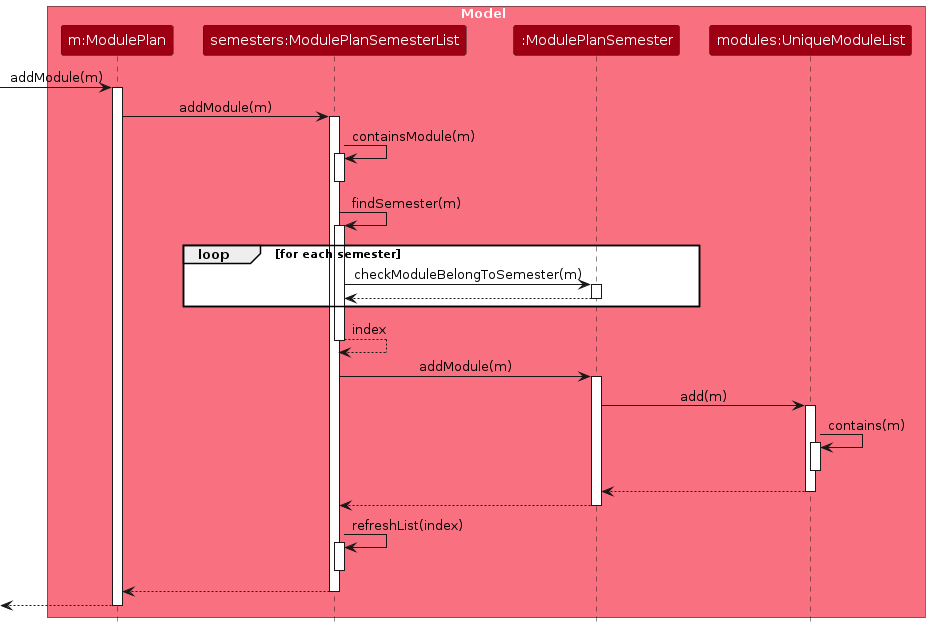
ModulePlanSemesterList:
ModulePlanSemesterList is where the main logic regarding modules that belong in different semesters is implemented. ModulePlanSemesterList contains a internalList of ModulePlanSemester and when a instance of ModulePlanSemesterList is created, its constructor populates the internalList with copies of a list of default ModulePlanSemester called DEFAULT_SEMESTER. DEFAULT_SEMESTER is a class level immutable list of ModulePlanSemester of both Semester 1 and 2 from Year 1 to 4.
ModulePlanSemesterListimplements the check for duplicate modules with the functioncontainsModule.- The function
findSemesteris used to figure out whichModulePlanSemesterto pass the module to while also acting as a check for whether the module in question is in the ModulePlan. getCAPandmodularCreditis also where the CAP and MC respectively are collated across all the semesters.ModulePlanSemesterListalso contains the logic for addingModulePlanSemesteroutside of the default ones and removing them when they are empty. These are implemented in theaddModuleandremoveModulefunctions respectively with the assistance of some helper functions likecheckIfSemesterEmptyandinDefaultSemesters.
ModulePlanSemester:
ModulePlanSemester is modeled after a semester in the timetable. It is identified by the fields Year and Semester and contains 1 UniqueModuleList. Like ModulePlan, there is not much logic implemented here and it mainly passes the input down and relays the result back up the hierarchy.
However, the logic for checking and grouping all Year 0 modules is implemented here, in the checkModuleBelongToSemester and checkIfSameSemester functions.
UniqueModuleList:
UniqueModuleList is where the Module objects are housed, in the ObservableList called internalList. It is also where logic for modules in the same semester are implemented.
- The functions
containsandmodulesAreUniqueensures that there is no duplicates within this semester. - The functions
modularCredits,findGradePointsWithUnitsandfindMcsForCapcalculates the CAP/MC for this particular semester only.
The following diagrams shows the flow for the main uses of ModulePlan, adding and removing modules.
Add Module:
Delete Module:
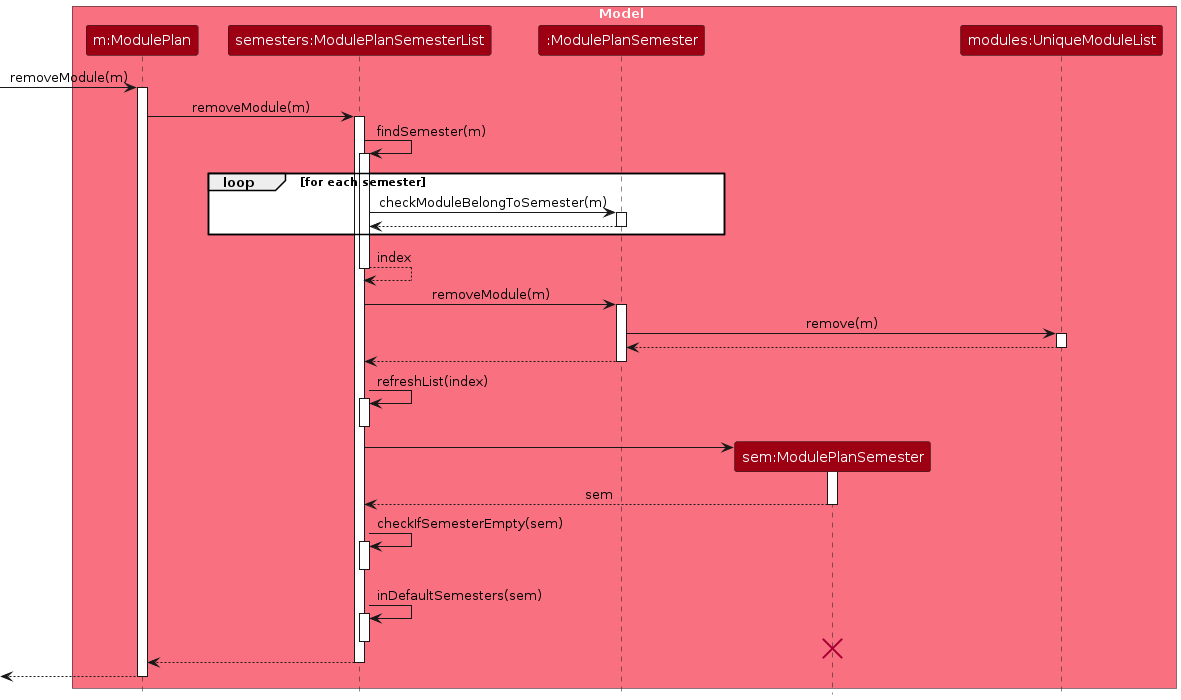
UI Integration
Changes in the ModulePlan are displayed to the user through an observer pattern where the listview in the UI class ModulePlanPane listens to the ObservableList in ModulePlanSemesterList and the listview in ModulePlanCard listens to the the ObservableList in UniqueModuleList.
The individual modules are then displayed in ModuleCard.
However, as changes in the UniqueModuleList will not propagate to the ObservableList in ModulePlanSemesterList, there is a need for the function refreshList to update the ObservableList in ModulePlanSemesterList whenever changes in the UniqueModuleList occurs.
Design Considerations
Aspect: Data Structure to Store Module
- Alternative 1 (Chosen): Store it in OOP fashion.
- Pros: Closely models the real world way of organizing the study plan (into each semester), logic for organizing and sorting the modules can be contained in the model instead of the Ui.
- Cons: A lot of overhead with the 4 level of classes.
- Alternative 2: Store it in a single list.
- Pros: Simple to implement and very little overhead.
- Cons: Ui component needs to organise the Module when displaying to user which is not what the Ui component is meant to do. Harder to visualise the data and thus harder to test and maintain code.
Alternative 1 is ultimately chosen as it helps abstracts out the logic for different semester to the Model component where it is meant to be and having a OOP structure makes it easier to visualise and thus test/maintain code. Which is important as this is a team-based project.
Module Storage
Overview
Modcraft stores two types of information on the hard drive, ModulePlan and UserPrefs(User Preferences). ModulePlan stores the user's last saved module plan when using Modcraft allowing the user to access their module plan across sessions. UserPrefs contains the last known user interface settings when using Modcraft allowing the user to return to their preferred interface across sessions.
ModulePlan is stored as moduleplan.json and UserPrefs is stored as preferences.json. Both files will be created if
they do not already exist in the same folder in which the Modcraft jar file is stored. While users are free to access
and modify the files as they wish it is recommended that they make a backup before any modifications. If Modcraft
cannot access a file, it will be deleted and replaced with a new empty file.
Feature details
- When the user launches the application, if there is no
moduleplan.jsonorpreferences.jsonfile detected in the same folder as Modcraft or they are corrupted, Modcraft will create them and populate them with the default moduleplan and preferences respectively. - If there are existing
moduleplan.jsonandpreferences.jsonfiles with appropriate data, Modcraft will read the module plan frommoduleplan.jsonand user preferences frompreferences.json, loading the application with the information obtained from the files. - Upon execution of any command that alters the user's module plan, the changes will automatically be saved into
moduleplan.json. - Upon alteration of any part of the user interface, the changes will automatically be saved into
preferences.json.
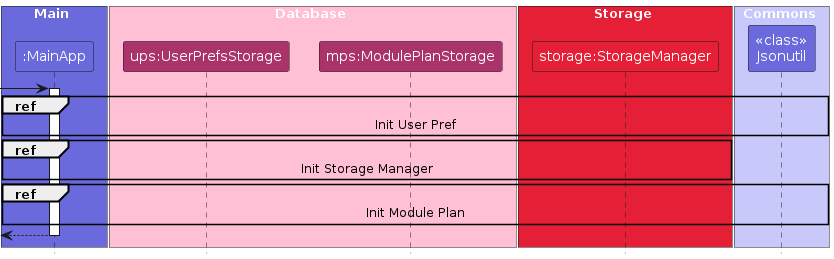
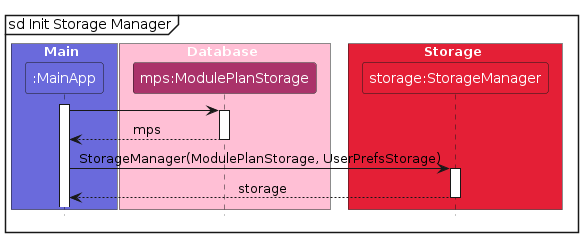
Initialization sequence
- At startup,
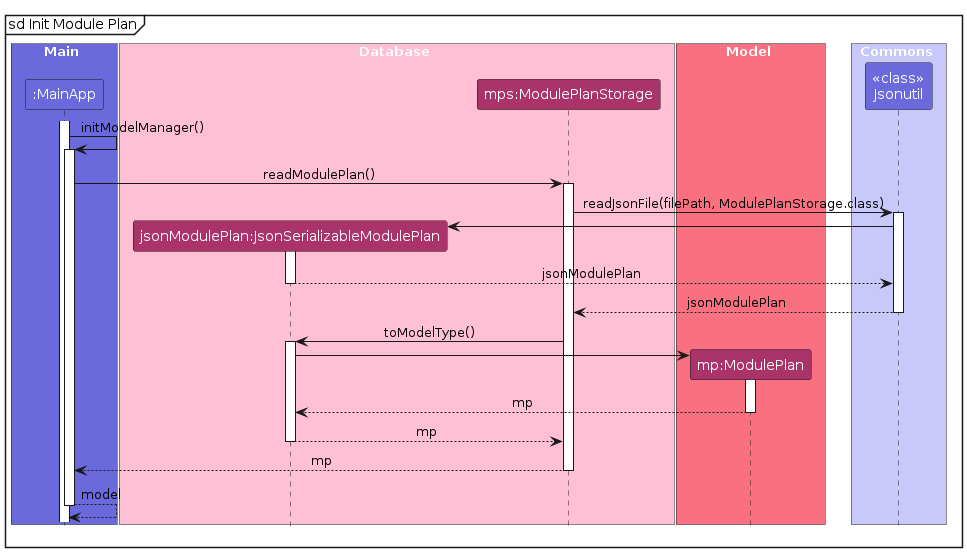
MainAppcallsMainApp#initPrefsto attempt to parse thepreferences.jsonfile. MainApp#initPrefscallsStorage#readUserPrefsto obtain the user preferences as aUserPrefsobject. 2a. IfDataLoadingExceptionis thrown, a newpreferences.jsonfile will be created with default preferences.JsonUserPrefsStoragedeserializes the JSON file by callingJsonUtil#readJsonFileinto aUserPrefsobject.MainAppcreates aStorageManagerobject with the file paths ofpreferences.jsonandmoduleplan.json.MainApp#initModelManageris then called which callsStorage#readModulePlanattempting to parse themoduleplan.jsonfile and create amodulePlanobject. 4a. IfDataLoadingExceptionis thrown, a newmoduleplan.jsonfile will be created with the default module plan.JsonModulePlanStoragedeserializes the JSON file into aJsonSerializableModulePlanobject by callingJsonUtil#readJsonFile. 5a. TheJsonSerializableModulePlanobject represents a list ofJsonAdaptedModuleobjects, created during deserialization.JsonModulePlanStoragethen callsJsonSerizaliableModulePlan#toModelTypeto create theReadOnlyModulePlanobject. 6a.JsonAdaptedModulethen callsJsonAdapedModule#toModelTypefor the creation of eachmodule.ModulePlanis returned toMainAppwhere it is used to initializeModelManager, which is used during command execution.- A
DataLoadingExceptionis thrown when any of the following occus.- the file cannot be found.
- an error occurs during deserialization, or
- the data contains invalid values.
This can be seen in the sequence diagram below

Module Data
Overview
The ModuleData object represents an internal list of all possible modules, which forms the base of the application. It allows for validation of the module codes in user input, and provides the required identity fields for the creation of modules to be saved to the user's study plan.
Implementation
Though the internal list utlizes the same class as ModulePlan, here the UniqueModulesList modules field models the full list of all NUS modules instead of the list of a user's modules in a given semester. It maintains the same property of protecting against duplicate modules, which are identified based on their similar module codes.
The checkDbValidModuleCode(ModuleCode) method fufills one of the two motivations of ModuleData: validation. It simply iterates through the internal list and checks if a module with a matching module code exists. It allows Modcraft to distinguish between valid and invalid modules codes during command execution.
Another purpose of ModuleData is to provide information about a module (e.g. its name, description and number of modular credits), if it is a valid NUS module. This is fufilled by the getModule(ModuleCode) method, which returns the desired module as an immutable Module object. This immutability is vital to preserve the correctness of the module information, so that future references to ModuleData return the same results.
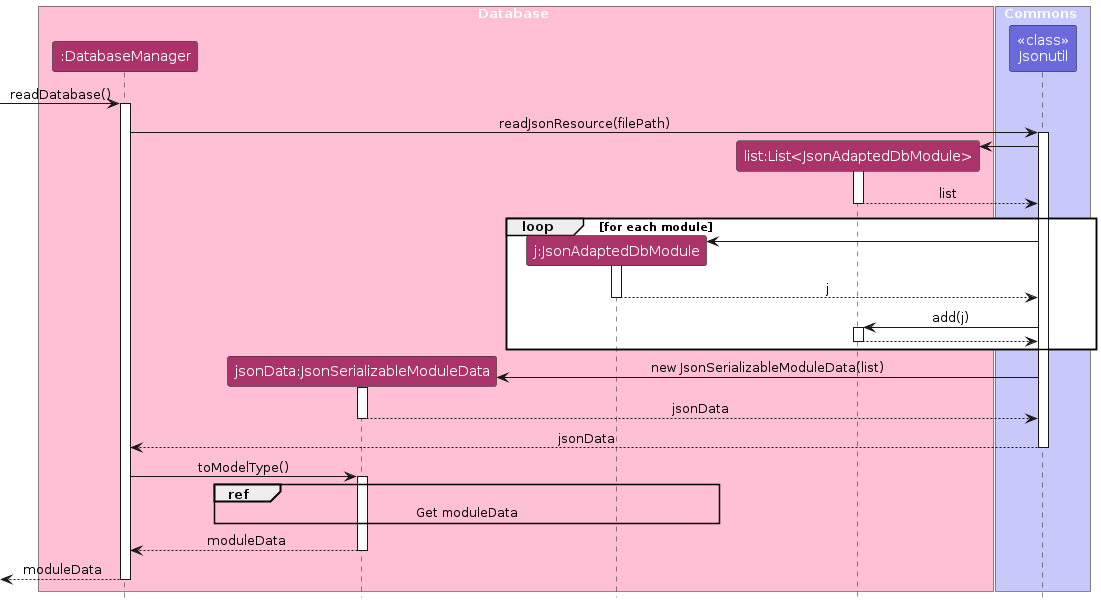
Initialization
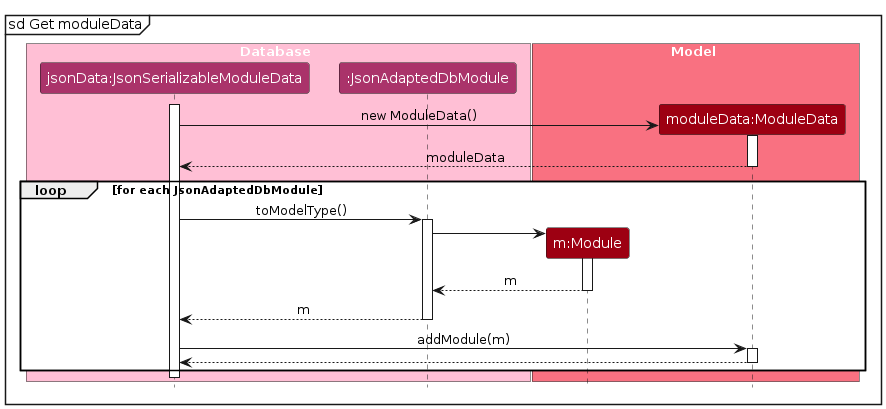
The module information (of over 15000 modules!) is stored as moduleinfo.json in the src/main/resources/database folder. Upon launching ModCraft, the module information is deserialized (with the help of the Jackson library) from JSON format to the ModuleData object through a series of conversions. The Module fields are parsed into Strings and combined into a JsonAdaptedDbModule object, which is then further collated into a JsonSerializableModuleData object. When the JsonSerializableModuleData#toModelType method is called, an empty ModuleData object is created before the conversion of all JsonAdaptedDbModule objects into Module objects, which are then added into ModuleData.
This initialization process can be shown through following sequence diagrams:
Note: Initialization failure
A DataLoadingException is thrown if:
- the file cannot be found,
- an error occurs during deserialization, or
- the data contains invalid values (e.g. negative modular credits)
In such cases where the data cannot be read successfully, a RuntimeException is deliberately triggered to forcefully abort the application's launch. This is necessary as most features are reliant on the validation and information provided by the ModuleData object.
Design considerations
Aspect: Location of moduleinfo.json
- Alternative 1: Expose the file. (Similar to the ModulePlan storage file implementation)
- Pros: The module information within the file could be inaccurate. Users will be able to easily modify/update information directly without developer intervention.
- Cons: New users might mistakenly make unintended modifications, causing the completeness/correctness of the information to be compromised. Due to the lack of a failsafe overwrite mechanism, the application might invariably fail at startup.
- Alternative 2 (Chosen): Hide the file in the resources folder.
- Pros: Maintain the completeness and correctness of the information.
- Cons: Lack of user customization for more advanced users. As module information changes over time, responsibilty falls on the developers to ensure the information is updated and error-free.
Add Module Command
Overview
The add command is used to add a module to the module plan with the information fields Module Code, Year Taken,
Semester Taken, and Grade.
The format for the add command can be found here
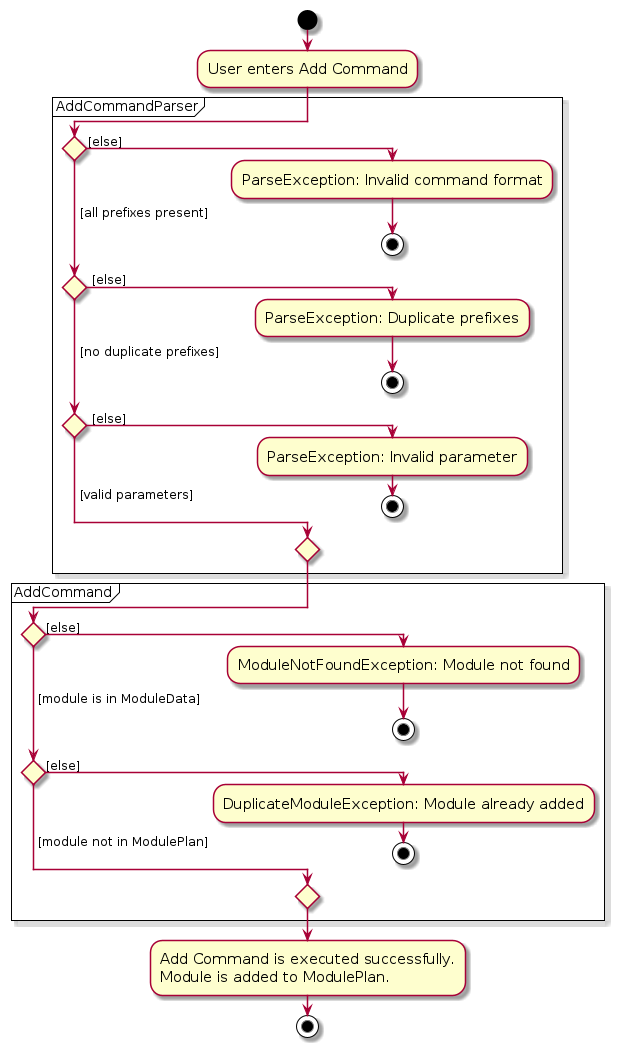
Feature details
- The user executes the
addcommand. - If any of the fields are not provided, an error message with the appropriate command usage will be displayed.
- If any of the command parameters are invalid, an error message with the appropriate parameter format will be displayed.
- The
Moduleis then searched in themodelto see if it is an existing module that NUS offers. If the module is not offered, an error message will be displayed. - The
Moduleis then checked withModulePlanto see if it has already been added to the module plan previously. If the module has already been added the User's module plan, an error message will be displayed. - If all the previous stages complete without exceptions or errors, the
Modulewill be added to theModulePlan
The activity diagram for adding a Module into the module plan
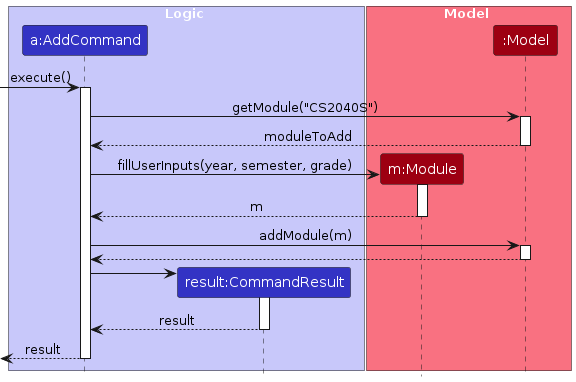
The sequence of the add command is as follows:
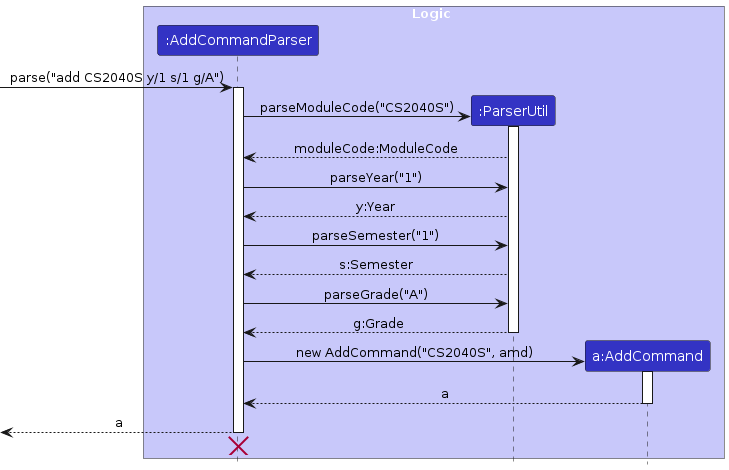
- The user inputs the
addcommand.
e.g.add CS2040S y/1 s/1 g/A - The
LogicManagercalls theModulePlanParser#parseCommandto parse the command. - The
ModulePlanParserthen creates a newAddCommandParserto parse the fields provided by the user and a newAddCommandis created. - The
AddCommandchecks if theModuleCodeis valid bt callingModel#getModuleFromDband retrieves the module if it exists from the database. AddCommandthen fills the user inputs into the module using theModule#fillUserInputsfunction.AddCommandthen attempts to add the module into the Model viaModel#addModule.- If
ModuleCode, the user inputs are valid, and the Model does not contain the module,AddCommandwill successfully add the newModuleinto the module plan.
The following two Sequence Diagrams shows how the add command works:
Here is the Sequence Diagram showing how the parser works:
And here is the Sequence Diagram showing the command being executed:
Edit Module Command
Overview
The edit command is used to change the information fields (e.g. year, semester and grade) for modules in the study plan.
The format for the edit command can be found here.
Feature details
The edit mechanism uses EditModuleDescriptor to abstract out the fields to edit. It can be found as a publicly accessible class within EditCommand. Currently, it only contains fields for Year, Semester and Grade, which are the only attributes of Module that can be edited for now. Besides this, it largely follows the parser and command structure as described in Logic.
We shall now illustrate how EditModuleDescriptor is used.
Here is a Sequence Diagram showing the parser in action:
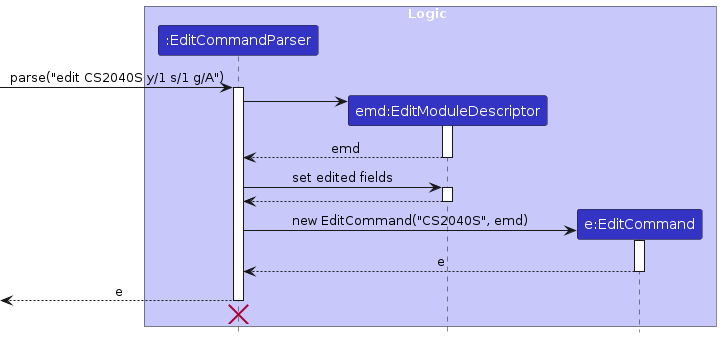
And here is a Sequence Diagram showing the command being executed:
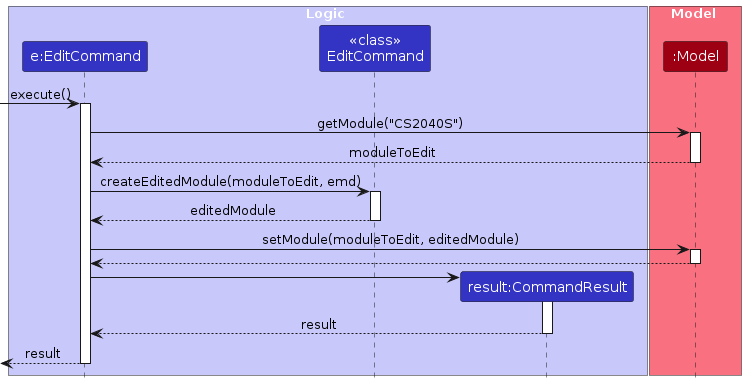
As can be seen, this is a helpful class to store fields that need to be edited.
Delete Module Command
Overview
The delete command is used to delete a module from the module plan. The module can only be deleted if it is already present in one of the semesters in the module plan.
The format of the delete command can be found here.
Feature details
- The user executes the
deletecommand. - If the module code field is not provided, an error message with the correct command usage will be shown.
- If invalid module code format is provided, an error message with the correct module code format will be shown.
- If valid module code format is provided but
Moduledoes not exist in database, an error message informing user that theModuledoes not exist will be shown. - The
Moduleis then cross-referenced in theModelto check if a module with the sameModuleCodeexists in the module plan. - If the module does not exist in the module plan, an error message informing the user that the
Modulehas not added to the module plan will be shown. - If all previous steps are completed without exceptions, the new
Modulewill be successfully deleted from the module plan.
The following activity diagrams show the logic of deleting a Module from the module plan:

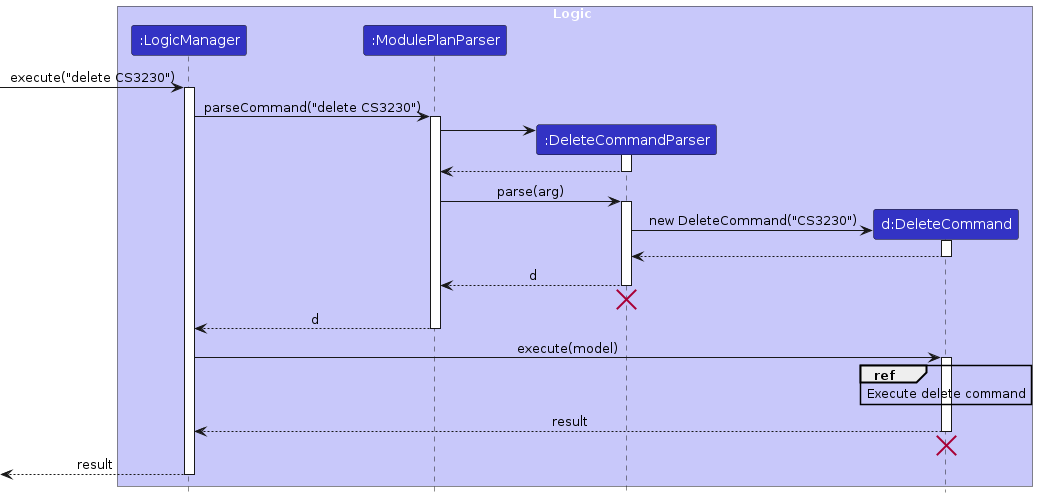
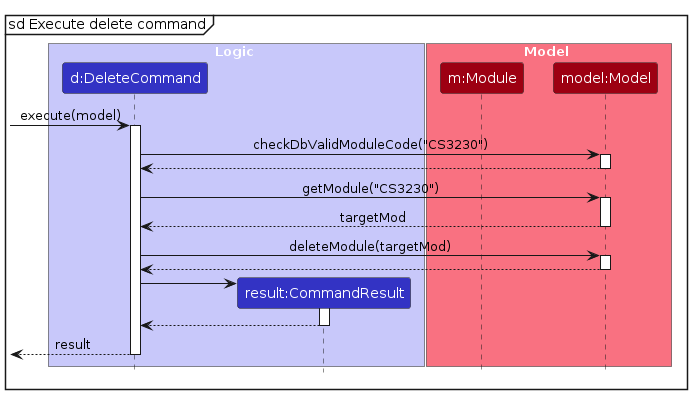
The sequence of the delete command is as follows:
- The user inputs the
deletecommand.
e.g.delete CS3230 - The
LogicManagercalls theModulePlanParser#parseCommandto parse the command. - The
ModulePlanParserthen creates a newDeleteCommandParserto parse the fields provided by the user and a newDeleteCommandis created. - The
DeleteCommandchecks if theModuleCodeis valid by callingModel#checkDbValidModuleCode. - The
DeleteCommandthen checks if theModelcontains a module with the sameModuleCodeby callingModel#getModule. - If the
ModuleCodeis valid andModelcontains the module, theDeleteCommandcallsModel#deleteModuleto delete the module from to the module plan.
The following sequence diagram shows how the delete command works:
Info Module Command
Overview
The info command is used to display information about a selected module, which is specified by the user by its module code.
The format of the info command can be found here.
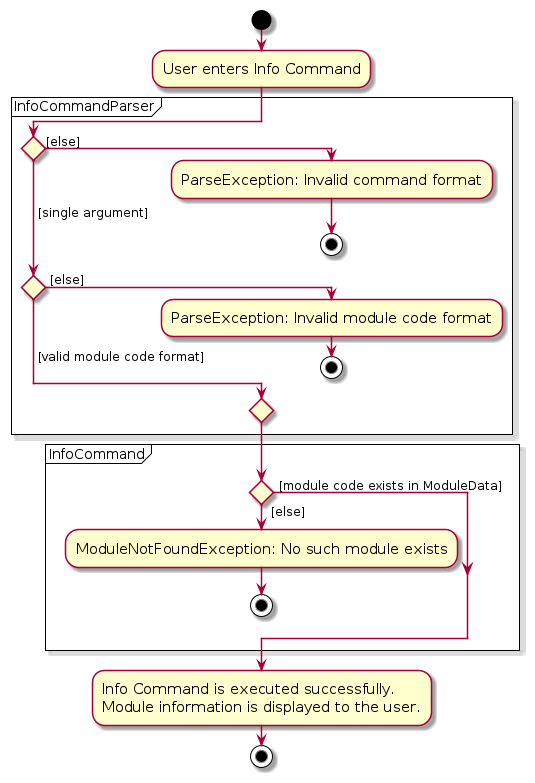
Feature details
- The user enters the
infocommand. - The
InfoCommandParserchecks that only a single argument is provided, and that the argument follows the valid module code format. - A
ParseExceptionis thrown if either of the above checks fail. Otherwise, anInfoCommandobject will be created and executed. - The
InfoCommandverifies that the module code exists inModuleData. Otherwise,ModuleNotFoundExceptionwill be thrown. - The
Moduleis retrieved from the database and the information is displayed to the user.
This is shown through the following activity diagram:
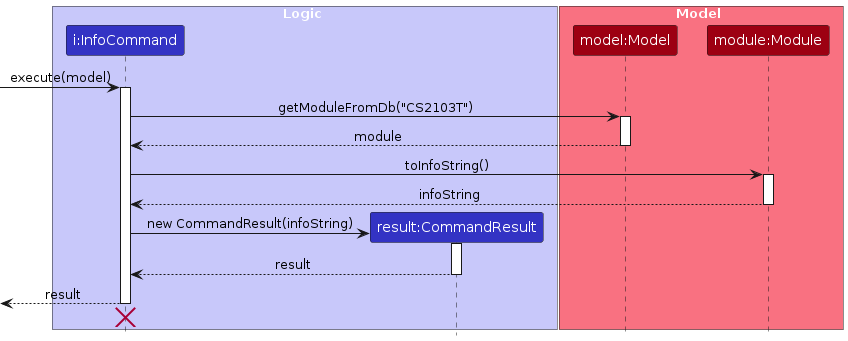
During command execution, the info command calls Module#toInfoString, as shown in the sequence diagram below:
Calculate CAP Command
Overview
The calculateCAP command is used to calculate the Cumulative Average Point (CAP) of all valid modules in the module plan, using their grade points and modular credits.
The format of the calculateCAP command can be found here.
Feature details
- The user executes the
calculateCAPcommand. - If the previous step is completed without exceptions, the CAP will be calculated and displayed.
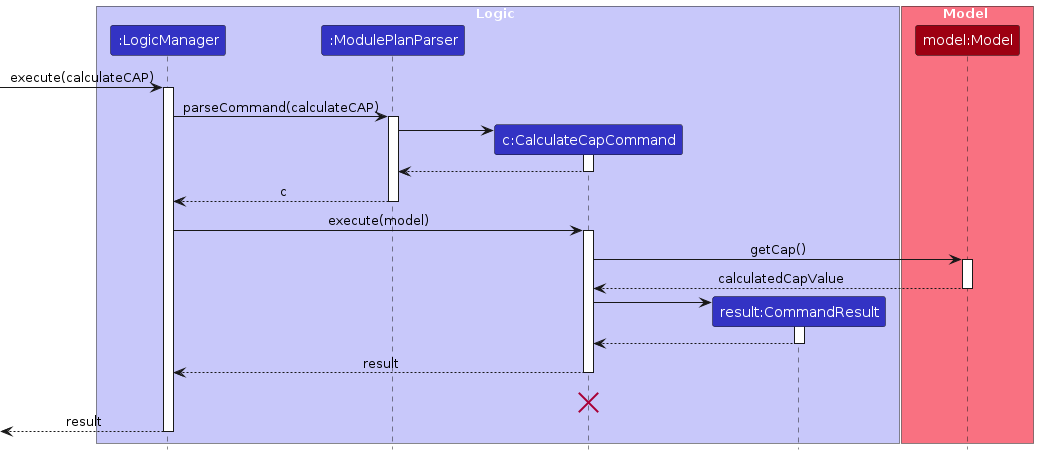
The sequence of the calculateCAP command is as follows:
- The user inputs the
calculateCAPcommand. - The
LogicManagercalls theModulePlanParser#parseCommandto parse the command. - The
ModulePlanParserthen creates a newCalculateCapCommand. - The
CalculateCapCommandcalculates the CAP by callingModel#getCap.
The following sequence diagram shows how the calculateCAP command works:
Calculate MC Command
Overview
The calculateMC command is used to calculate the total sum of Modular Credits (MCs) of all modules in the module plan, regardless of their grades.
The format of the calculateMC command can be found here.
Feature details
- The user executes the
calculateMCcommand. - If the previous step is completed without exceptions, the number of MCs will be calculated and displayed.
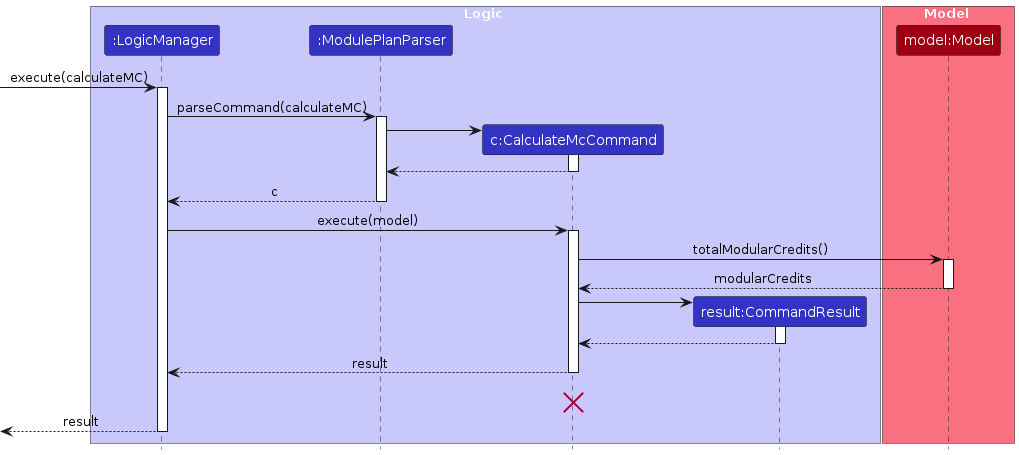
The sequence of the calculateMC command is as follows:
- The user inputs the
calculateMCcommand. - The
LogicManagercalls theModulePlanParser#parseCommandto parse the command. - The
ModulePlanParserthen creates a newCalculateMcCommand. - The
CalculateMcCommandcalculates the CAP by callingModel#totalModularCredits.
The following sequence diagram shows how the calculateMC command works:
[Proposed] Pre-requisite checking feature
Proposed Implementation
The proposed pre-requisite checking mechanism is facilitated by Prerequisite. Every Module will have a Prerequisite field. Prerequisite contains a list of other Prerequisite objects, of which Module is a subclass. It also contains a number that represents the number of Prerequisites in the list that need to be fulfilled before this Prerequisite can be considered fulfilled. Additionally, it implements the following operation:
Prerequisite#isFulfilled(List<Module> list): Checks whether the currentPrerequisiteis fulfilled by theModules inlist.
This operation is accessed in Module as Module#checkPrerequisitesFulfilled(List<Module> list).
Here is the class diagram:

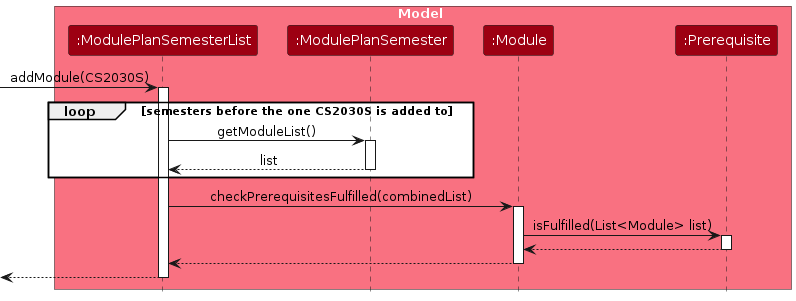
Given below is an example usage scenario and how the prerequisite mechanism behaves at each step.
Step 1. The user executes add CS2103T y/2 s/1 g/IP command to add the module CS2103T in the module plan.
Step 2. When executing the add command, Module#checkPrerequisitesFulfilled(List<Module> list) is called to check if the prerequisites have been fulfilled in previous semesters. In this case, these are the Advanced Placement and Year 1 semesters, and the Modules in these semesters populate list.
Step 3. ModCraft lets the user know if the prerequisites have not been fulfilled, and which prerequisites. Otherwise, it adds the module CS2103T to Year 2 Semester 1.
Note: If the module is in the Advanced Placement, there are no other semesters to check.
Step 4. The user now decides to move the module to an earlier semester, and decides to make the appropriate changes by executing the command edit CS2103T y/1 s/2. The edit command calls Module#checkPrerequisitesFulfilled(List<Module> list) again to check if the prerequisites have been fulfilled in previous semesters. In this case, they are the Advanced Placement and Year 1 Semester 1 semesters, and the Modules in these semesters populate list.
Step 5. ModCraft lets the user know if the prerequisites have not been fulfilled, and which prerequisites. Otherwise, it moves the module CS2103T to Year 1 Semester 2.
The following sequence diagram shows how the prerequisite checking works:
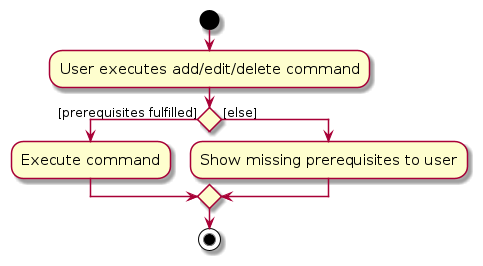
The following activity diagram summarizes what happens when a user executes a command that changes the ModulePlan:
Future enhancements
For our next steps, we plan to add the following features:
- Check if a module is CS/CU or not, and check if the grade given from user input is valid for that module.
- Check which semesters a module is offered, and check if the semester given from user input is valid for that module.
- Check for a module's pre-requisites, and check if they are fulfilled before allowing the user to add the module.
- Check for a module's pre-clusions, and prevent users from adding modules that are pre-clusions of each other.
- Check for a module's co-requisites, and remind users to add modules that are co-requisites of each other and to take them concurrently.
- Check for a module's availability of S/U options, and prevent users from inputting S/U grades to non-S/U-able modules.
- Add support for allowing users to add a module that was failed in a previous semester to another new semester.
Documentation, logging, testing, configuration, dev-ops
Appendix: Requirements
Product scope
Target user profile:
- is planning to take NUS modules
- prefer desktop apps over other types
- can type fast
- prefers typing to mouse interactions
- is reasonably comfortable using CLI apps
Value proposition: Provide a fast and easy way for students to track courses to take to meet graduation requirements and plan courses to take, optimized for users who prefer typing in CLI.
User stories
Priorities: High (must have) - * * *, Medium (nice to have) - * *, Low (unlikely to have) - *
| Priority | As a … | I want to … | So that I can… |
|---|---|---|---|
* * * | fast typer | use the typing interface | I save time from interacting with the GUI |
* * * | current student | add modules to "taken" / "taking" / "plan to take" lists | |
* * * | current student | search for modules by module code or module name | |
* * * | current student | remove modules from the lists | |
* * * | current student | access data entered in a previous session | |
* * * | forgetful student | view which year and semester I have taken certain modules | |
* * * | incoming freshman | see the modules I might need to take for my course | I can make an informed decision about what I am applying for |
* * * | current student | check how many MCs I haven taken | I know how many more I need to take to graduate |
* * * | overworked student | just check what modules I have taken | I don't have to remember them myself |
* * | current student | set my major | |
* * | current student | see the modules I need to take to graduate | I can apply for and take those modules to graduate |
* * | current student | see how the modules I plan to take affect what modules I will be able to take in the future | I can plan my future semesters |
* * | current student | check what prerequisite modules I need to take | I can take this specific module |
* * | struggling student | see what modules I can use my remaining S/Us on | I can plan my modules accordingly |
* * | current student | set the grade for taken mods and expected grade for future mods | the app can calculate my CAP for me |
* * | current student | see my current calculated CAP / predicted graduation CAP | I do not have to calculate it myself |
* * | graduated student | check what modules I have taken to revise the skills I have learnt in university | I can use my skills at my job |
* * | graduated student | check the modules I have taken for completing my resume and answering interview questions | I can get the job |
* * | student with many friends in different majors | check whether I can also take the modules they are taking | we can help each other with the module |
* * | double major/degree student | check what modules I can double count | I can lower my workload |
* * | student looking to take a second major or minor | see if I can take the modules required | I can obtain the second major or minor |
* * | student staying in RC/NUSC or taking other special programs (like SPM) | check for modules that fulfill requirements | I can replace the general education modules |
* * | student that wants to take niche modules | search for it | I know what are the options |
* * | current student | see if certain modules are available in the current semester | I can plan my study plan or take it this semester |
* * | student taking credit-bearing internships | see how my internships fulfill my graduation requirement and MCs | |
* * | student taking a focus area | see if the module I have taken satisfy my focus area | |
* * | failing student | see if I can drop certain modules | I can graduate through an alternate path |
* * | student looking for work | see which modules give me skills I need | I can apply for certain jobs/internships |
* * | student who wants to switch courses | check which modules I can carry over and still take | I can graduate |
* | student who likes a certain professor | see which semester that professor will be teaching the module | I can take their module |
* | student who dislikes a certain professor | see which modules they will be teaching | I can avoid them |
* | student going on exchange | see which modules can be mapped over | |
* | advanced user | manually edit the data file | I can manipulate the data as I wish |
* | student that hates a specific module | check for other alternative modules so that I can avoid that module | I can prevent excessive stress |
* | ambitious student | find the fastest way to graduate | |
* | kiasu student | see which modules are popular/oversubscribed | I can adjust my academic plan |
* | JC/Poly student | see what modules I am exempted from | |
* | foreign student | see the bridging modules I am required to take | |
* | current student | check if I am exempted from the bridging modules | I can take them to skip the mod |
* | Advanced Placement student | add what modules I have taken before | |
* | current student | see which modules have a diagnostic test | I can skip the mod |
* | tryhard student | see what modules are available in the special term |
Use cases
(For all use cases below, the System is ModCraft and the Actor is the user, unless specified otherwise)
Use case: UC01 - Planning mods to take in the upcoming semester
MSS
- User searches a module that he wants to take next semester.
- Modcraft displays the information for the module.
- User adds that module to their module plan.
- Modcraft shows the module in the User’s module plan.
Steps 1-4 are repeated for each module the User is interested in.
Use case ends.
Extensions
- 1a. Modcraft detects that the module does not exist.
- 1a1. Modcraft informs the user it is unavailable.
- 1a2. User searches another module.
Steps 1a1 to 1a2 are repeated until the module is available. Use case resumes from step 2.
- *a. At any time, user choose to delete a module.
- *a1. User deletes the module.
- *a2. Modcraft removes the module from the timetable. Use case resumes from step 1.
Use case: UC02 - Updating end of semester grades
MSS
- User inputs grades for a module that they have taken.
- Modcraft shows the updated grade in the timetable.
Steps 1-2 are repeated for each grade the user would like to update for.
Use case ends.
Extensions
- 1a. Grade is invalid.
- 1a1. Modcraft shows the user the grade is invalid.
- 1a2. User inputs correct grade.
Steps 1a1 and 1a2 are repeated until the user inputs the correct grade. Use case resumes from step 2.
Use case: UC03 - Calculating CAP
MSS
- User asks ModCraft for their current CAP.
- System show the current CAP of all modules that have been taken.
Use case ends.
Use case: UC04 - Calculating MC
MSS
- User inputs taken modules.
- User requests for MC calculation.
- ModCraft displays number of MCs taken.
- User inputs planned future modules with IP grade.
- User requests for MC calculation.
- ModCraft displays updated number of MCs (including IP modules).
Steps 4-6 are repeated for each combination of modules the user tries.
Use case ends.
Use case: UC05 - Indicating exempted modules
MSS
- User inputs
EXEas the grade for a module that they have taken. - System shows the updated grade for the module, which is
EXE, in the timetable.
Steps 1-2 are repeated for each module that the user would like to indicate as exempted.
Use case ends.
Extensions
- 1a. Module code is invalid.
- 1a1. System shows the user that the module code inputted is invalid.
- 1a2. User inputs correct module code.
Steps 1a1 and 1a2 are repeated until the user inputs the correct module code. Use case resumes from step 2.
Use case: UC06 - S/Uing modules
MSS
- User inputs
SorUas the grade for a module that they have taken. - System shows the updated grade for the module, which is
SorU, in the timetable. Steps 1-2 are repeated for each module that the user would like to indicate as Satisfactory (S) or Unsatisfactory (U).
Use case ends.
Extensions
- 1a. Module code is invalid.
- 1a1. System shows the user that the module code inputted is invalid.
- 1a2. User inputs correct module code.
Steps 1a1 and 1a2 are repeated until the user inputs the correct module code. Use case resumes from step 2.
Use Case: UC07 - Indicating Advanced Placement Modules
MSS
- User searches for the advanced placement module that they have taken or are planning to take using the info command.
- User adds the module to the module plan.
- Modcraft shows the module in the module plan.
Use case ends.
Extensions
- 1a. Modcraft detects that the module does not exist or not available for advanced placement.
- 1a1. Modcraft informs the user it is unavailable.
- 1a2. User searches another module.
Steps 1a1 to 1a2 are repeated until the module is available. Use case resumes from step 2.
Use Case: UC08 - Indicating Special Term Modules
MSS
- User searches for a special term module using the info command.
- Modcraft shows that the module is available to be taken in the special term.
- User adds the module to the module plan.
- Modcraft shows the module in the User's module plan.
Use case ends.
Extensions
- 1a. Modcraft detects that the module does not exist or not available for advanced placement.
- 1a1. Modcraft informs the user it is unavailable.
- 1a2. User searches another module.
Steps 1a1 to 1a2 are repeated until the module is available. Use case resumes from step 2.
- 3a. User wants to indicate that the module is taken or to be taken in Special Term 1 or Special Term 2.
- 3a1. User uses the add command and specifies the semester to be
s/ST1for Special Term 1 ors/ST2for Special Term 2.
- 3a1. User uses the add command and specifies the semester to be
Use case resumes from step 4.
Use Case: UC09 - Dropping Modules
MSS
- User edits the grade of module he/she want to drop to
WorF. - Modcraft shows that the module has been edited to the appropriate grade.
Use case ends.
Extensions
- 1a. Module code is invalid.
- 1a1. System shows the user that the module code inputted is invalid.
- 1a2. User inputs correct module code.
Steps 1a1 and 1a2 are repeated until the user inputs the correct module code. Use case resumes from step 2.
- 1b. Module not in study plan.
- 1b1. System shows the user that the module code inputted is not in study plan.
- 1b2. User inputs another module code.
Steps 1b1 and 1b2 are repeated until the user inputs the correct module code. Use case resumes from step 2.
Non-Functional Requirements
- Should work on any mainstream OS as long as it has Java 11 or above installed.
- A user with above average typing speed for regular English text (i.e. not code, not system admin commands) should be able to accomplish most of the tasks faster using commands than using the mouse.
- Should be able to hold up to 1,000,000 courses without a noticeable sluggishness in performance for typical usage.
Glossary
- Mainstream OS: Windows, Linux, Unix, OS-X.
- Command Line Interface (CLI): A display that allows you to type commands to interact with the application.
- Graphical User Interface (GUI): A user-friendly display that allows you to see the effects of your actions in the application.
- JSON: stands for JavaScript Object Notation, a lightweight data-interchange format and a plain text written in JavaScript object notation, used to send data between computers.
- Pre-requisite: Pre-requisites indicate the base of knowledge on which the subject matter of a particular course will be built. Before taking a course, a student should complete any pre-requisite course(s) listed for that particular course.
Where pre-requisites are specified, equivalent courses will also be accepted. For more information on pre-requisites, please refer to NUS's Modular System. - Pre-clusions: Courses that have similar emphases and may not be taken together with that particular course.
- Co-requisites: Courses that are to be taken concurrently.
Appendix: Instructions for manual testing
Given below are instructions to test the app manually.
Note: These instructions only provide a starting point for testers to work on; testers are expected to do more exploratory testing.
Launch and shutdown
Initial launch
Download the jar file and copy into an empty folder
Open command terminal and
cdinto the folder where the jar file is in. Use thejava -jar ModCraft.jarcommand to run the application.
Expected: Shows the GUI with a set of sample modules. The window size may not be optimum.
Saving window preferences
Resize the window to an optimum size. Move the window to a different location. Close the window.
Re-launch the app by double-clicking the jar file.
Expected: The most recent window size and location is retained.
Adding a module
Adding a module into a semester
Prerequisites: No new modules are being added except for those default modules present in ModCraft.
Test case:
add CS2030S y/1 s/1 g/IP.
Expected: The moduleCS2030Sis added to the listYear 1 S1, with its grade asIPin a grey box. Details of the added module shown in the status message. The modules shown in the semester list is updated.Test case:
add CS3230 y/0 s/1 g/A.
Expected: A new column of semester namedAdv Placementappears. The moduleCS3230is added to the listAdv Placement, with its grade asAin a green box. Details of the added module shown in the status message. The modules shown in the semester list is updated.Test case:
add CS1010 y/1 s/ST1 g/F.
Expected: A new column of semester namedYear 1 ST1appears. The moduleCS1010is added to the listYear 1 ST1, with its grade asFin a red box. Details of the added module shown in the status message. The modules shown in the semester list is updated.Test case:
add CS1231S ...when it is already in the semester list.
Expected: No module is added. Error details shown in the status message. Status bar remains the same.Test case:
add CS1010 y/1 s/ST1 g/a.
Expected: No module is added. Error details of wrong format of grade shown in the status message. Status bar remains the same.Other incorrect add commands to try:
add,add 1234,add CS1010 y/1,...(when the format of the module code to be added is incorrect)
Expected: Similar to previous.
Deleting a module
Deleting a module from a semester
Prerequisites: Multiple modules in the list.
Test case:
delete CS2030S.
Expected: The moduleCS2030Sis deleted from the list. Details of the deleted module shown in the status message. The modules shown in the semester list is updated.Test case:
delete CS1231Swhen it is not in the semester list.
Expected: No module is deleted. Error details shown in the status message. Status bar remains the same.Other incorrect delete commands to try:
delete,delete 1234,...(when the format of the module code to be deleted is incorrect).
Expected: Similar to previous.
Editing a module
Editing a module already present in a semester
Prerequisites: The module to be edited is already present in ModCraft.
Test case:
edit CS2030S g/IP.
Expected: The grade ofCS2030Sis updated toIPin a grey box. Details of the edited module shown in the status message. The module shown in the semester list is updated.Test case:
edit CS3230 y/0.
Expected: A new column of semester namedAdv Placementappears. The moduleCS3230is moved to the listAdv Placement, while its grade remain unchanged. Details of the edited module shown in the status message. The modules shown in the semester list is updated.Test case:
edit CS1010 s/ST1.
Expected: A new column of semester namedST1appears. The moduleCS1010is moved to the listST1, while its grade and semester remain unchanged. Details of the added module shown in the status message. The modules shown in the semester list is updated.Test case:
edit CS1010 g/a.
Expected: No module is edited. Error details of wrong format of grade shown in the status message. Status bar remains the same.Test case:
edit CS1101S ...when it is not already present in the semester list.
Expected: No module is edited. Error details shown in the status message. Status bar remains the same.Other incorrect edit commands to try:
edit,edit 1234,...(when the format of the module code to be edited is incorrect)
Expected: Similar to previous.
Finding info about a module
Finding information about a module from the database
Test case:
info CS2030S.
Expected: The module code, module title, modular credit and module description ofCS2030Sis displayed.Other incorrect info commands to try:
info,info 1234,...(when the format of the module code to be searched is incorrect).
No information about module is displayed. Error details shown in the status message. Status bar remains the same.
Calculating total CAP
Calculating the current CAP from all modules
Test case:
calculateCAPwhen there are no modules in the semester list.
Expected: The CAP output is0.0.Prerequisites: Multiple module in the list.
Test case:
calculateCAP.
Expected: The CAP output is afloatof0.0CAP 5.0with a status message.Test case:
calculateCAPwhen grades of all modules are marked asIP,EXE,W,IC,S,U,CSorCU.
Expected: The CAP output is0.0.
Calculating total Modular Credits (MCs)
Calculating the current Modular Credits (MCs) from all modules
Test case:
calculateMCwhen there are no modules in all the semester lists.
Expected: The Modular Credits output is0.0.Prerequisites: Multiple modules in the list.
Test case:
calculateMC.
Expected: The Modular Credits output is afloatof Modular Credits0.0with a status message.
Saving data
Dealing with missing/corrupted data files
Prerequisites: There are existing module and module plan files with existing stored modules.
Test Case: Close the application and delete
moduleplan.json. Expected: Upon the next application start, a newmoduleplan.jsonis created.Test Case: Close the application and edit
moduleplan.jsonby changing the name of the first Module toCS3230. Expected: Upon the next application start, the name of the first Module in chronological order in the list of years and semesters will appear asCS3230.Test Case: Close the application and edit
moduleplan.jsonby changing the year of the first Module to2. Expected: Upon the next application start, the name of the first Module will appear inYear 2, with its semester and grade unchanged.Test Case: Close the application and edit
moduleplan.jsonby changing the semester of the first Module toST2. Expected: Upon the next application start, the name of the first Module will appear inST2, with its year and grade unchanged.Test Case: Close the application and edit
moduleplan.jsonby changing the grade of the first Module toIP. Expected: Upon the next application start, the grade of the first Module in chronological order in the list of years and semesters will appear asIP, which should be grey in colour. Its name should remain unchanged.